
In this post, I will show you how you can perform a full system backup of Windows 8.1 with built-in backup features and tools. Maybe you don’t know it, but Windows 8 as well as Windows 7 has a built in bare-metal Backup & Recovery options for you to use. In Windows 8 these features can be a bit tricky to find, but I will show you where you find them and how you use them.
I use those built-in features myself, to create backups of my home computer. I have a large, cheap SATA HDD in an eSATA dock station standing on my desk. When I think it is time to make a backup of my system, I turn it on and start the backup procedure.
One of the cool thing about this solution, other than it is built-in and free, is that I can keep on working on my computer, while the backup is running. That is because this backup feature is using Shadow copies, making a snapshot of the system, as it was when I started the backup. Another great feature is that it makes incremental backups, meaning that it does not need to make a full backup each time. It can  just takes the changes since the last backup I made. That gives me multiple backup versions to choose from. One thing that has changed in Windows 8 and Windows 8.1 is the ability to restore single files from a system image backup. The restore of file items has been removed. Instead, you can turn on a new feature called File History, to keep a backup of your pictures, music, documents and videos. See more info about Windows 8.1 Backup and Restore options here.
Where do I find Windows 8 Backup utility?
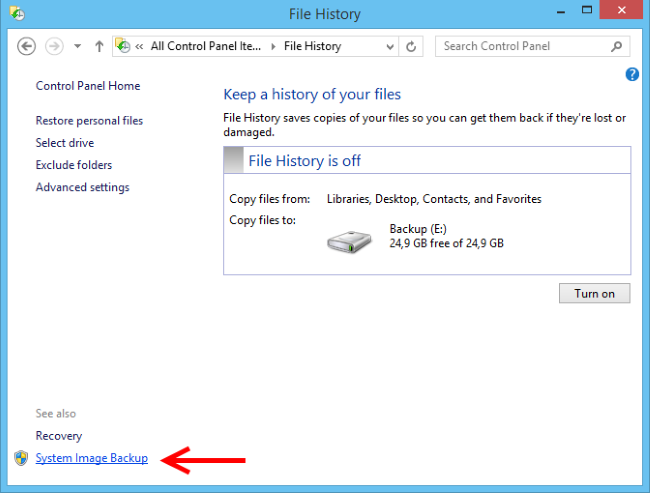
See that feature has been hidden very well in Windows 8/Windows 8.1. I am not sure why Microsoft have made so hard to find this feature, but you will need to enter the Control panel and enter File History. It does not make much sense to put it in there, but that is where you fill find it. To be honest it took me a while to find it.

In the lower left corner you find System Image Backup.
How Does Full backup works in Windows 8
The backup feature in Windows 8.1 works pretty much the same way as in Windows 7, first you have found it 😉 You can chose to backup to another hard drive, to DVD or to a Network location. It is still not possible to do a schedule backup.

Demo of Windows 8 System image Backup and Restore
I have created a little demonstration video on how it works. In the end of this video, I will even show you how you can use a PowerShell command-line command to execute the backup process.
Please drop me a comment below, if you have any questions or just a comment to Windows 8.1 System Image Backup and recovery.

This was a very helpful post.
In case you lose your data then you can restore that if you have backup for that.
Amazing Post. Will share it on social media so that others can also prevent Data Loss.
Thanks for Posting this Article!
Thank you. Glad you liked this post.
Can i use this backup on Windows 7 or XP ? Because Windows 8 Lags in my PC when i install some applications so i planned to switch back to 7.
Hi
There is a similar backup feature built-in to Windows 7. It is almost the same tool. In fact, I think it has better restore capabilities in Windows 7. As I recall it you will have to use ntbackup in Windows XP.
Hi Thomas, very useful techy post like always! i was busy creating a WordPress theme and i will be glad if you check it. It will be available soon in the wordpress.org directory.
Hi Thomas
The article was very helpful as i have recently switch from OS X to Windows i had no idea about any of the things related to Windows and this post was very helpful for me to create backup on my Windows 8.1 PC
Thank You
Hi, this is very useful article for me. Keep posting such articles. Thanks for sharing.
Thanks for the article… I did alot of search about this because i wanna create my windows backup too.. this page helped alot
Hi all,,,
This is a great share of information. I really liked the above information.I would like to add the following points-
1- Right-click the Start button and launch Control Panel.
2- Click File History.
3- While in File History, click the System Image Backup link in the bottom-left corner of the screen.
4- Connect an external USB hard drive with enough free space.
5- In the backup wizard, you’ll be prompted to choose from one of the three options to save the backup. For this example, we are going select the hard drive you just connected.
The loss of data also leads to inconvenience. But now there are many data recovery companies which can solve your data in no time, These companies have efficient engineers for effective data rescue.
Commming back to back up of windows 8.1, keep in mind that you can backup to DVD blanks and a network share, but these options will slow down the backup process.
Thanks a lot for this tutorial on how to do backup on my Windows 8. I did not understand how to go about this. I am glad I stumbled on this helpful post. Thanks so much.