
Recently I came across a problem running a little tool after upgrading to Windows 10 Creators Update. I was unable to launch this small tool I had downloaded from a trusted blog, this blog 🙂 In this post I will show how you can change the settings in Windows Defender to overcome this issue.
What is Windows SmartScreen
Windows SmartScreen is a built into Windows 10 to block unknown and potential dangerous programs from making changes to the operating system. That can be virus, cryptologgers or other malware that is trying to take control of our computer. Most settings regarding SmartScreen can be controlled in Windows Defender.
SmartScreen Setting in Defender
After you upgraded to Windows Creators Update I have been experiencing issues running tools not digital signed from a trusted publisher. Of cause, it is always best when the tools you download from the Internet is digital signed, but sometimes it can be necessary to run a program or tool that not signed. In my case it was a tool I have developed myself and then this was just an annoying issue I needed a solution for.
The problem
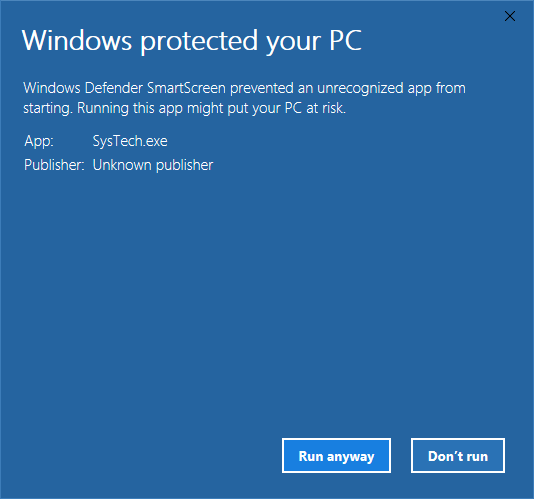
This is the dialog showing when you try to run an .exe file that is not code signed by a trusted publisher that Microsoft trust. Of cause, it is a good thing that Windows SmartScreen is protecting us from running unwanted executables like crypto-loggers and ransomware. However, it might be needed to overrule this security setting in some occasions.

Sometimes you can click on “More info” and continue anyway by clicking on “Run Anyway”
The solution to turn of SmartScreen on apps
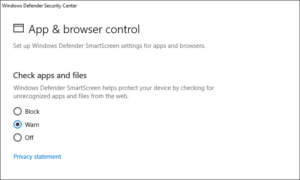
The solution to bypass this issue and continue running the program (.exe), is to open up Windows Defender and change the SmartScreen setting. It is found under “App & browser control”. If you are new to Windows 10 Creators Update you may notice that Windows Defender has been upgraded with a new user interface since you last checked the settings.

Under “Check apps and files” you have 3 options. Block, Warn or Off. I will not recommend choosing of unless it is for a short period of time. Overall SmartScreen is a good thing protecting us from harming our computer by accident. Setting it to “Warn” still give us a chance to regret our action before the program executes.

I hope you found this information useful. You are welcome to drop me a comment or question below.
Hi Thomas,
Very informative post. I too got the similar dialog box while installing a photo editing tool, some days back. I am glad to see your post and resolution on this issue.
Take care,
Have you a nice week ahead.
I got this SmartScreen filter last night when I was downloading the new version of KeePass password safe. But after searching the web, I got your article and got rid of this issue.
Thank you for this guide.